A panoramic photograph involves placing or "stitching" two or more photographs together to capture a wide vista. While it is possible to use a wide-angled lens to get similar results, this can exaggerate the distances between elements and introduce potentially unwanted perspective issues. Using a photographic panorama will overcome this.
Which focal length to choose?
The ideal focal length (assuming you want results which closely emulate the perspective of the human eye) is in the range of 50mm to 85mm. However, as long as the focal length is in excess of 50mm, it doesn’t really matter. For example, great results can be achieved with a 200mm lens. In fact, longer focal lengths will mean less edge distortion and therefore more accurate stitching.
Using a length less than 40mm does have issues because wide-angled lenses suffer from unavoidable distortion as you near the edge of the frame. This makes it impossible to stitch two or more images together seamlessly.
Which aperture to use?
Deciding on the appropriate aperture depends on the look you want to achieve. If you are trying to capture a landscape, you need to have a reasonably deep depth of field. Therefore, shooting with a lens between 50mm and 85mm, with an aperture of between f/11 to f/16 should ensure this.
Shoot in manual mode
It’s important that the exposure of all frames is equal. While you can rectify this to some extent in post-production, I recommended doing this during the shoot. When you compose your panorama, you will need to decide which compositional element is key to the overall image and then expose for this. In each subsequent shot, you will need to retain this exposure value.
Image orientation
Use portrait as the image orientation as it will have the least amount of edge distortion. This means it will be much more accurate when you stitch the frames together.
Where should you set the focus point within the scene?
The biggest problem you will encounter when stitching images together are parallax errors - the lining up of compositional elements in the images. Typically, you will be able to align either the foreground elements or the distant elements but seldom both, unless you shoot using a special panorama head. This means you need to decide which elements are more important in the image (e.g. the rocks, trees, hills or mountains). My suggestion is to either focus on the foreground elements or somewhere a third of the way into the frame. To a large extent, the non-alignment of the background elements can be rectified in post-production.
Should you use a tripod?
A tripod will help to ensure your images are lined up. It's also possible to use a dedicated panoramic tripod head for even better results. This is a type of tripod head that can rotate around the "no-parallax" point of the lens and will help to achieve a final image with seamless stitching. Whatever tripod head you use, it is very important that it is level with the ground so that the horizon remains level when you rotate the head.
Capturing the image
Shoot in RAW format and try to aim for approximately 40% overlap between images. This will make it easier to align the images in post-production.
Post-production
Using software such as Photoshop, you can adjust the exposure across each image so that they match. However, keep in mind that natural lighting conditions aren't typically constant in a wide vista.
There are two methods to stitch the images together in Photoshop:
- Manually: create a canvas and drag your separate image files onto this, manually aligning the individual photographs. Use the Clone tool to fix elements which don't perfectly align.
- Automatically: use the Photomerge tool which will merge your images into a single panorama. Be aware that this may not always produce optimal results.
Images courtesy Robert Irving
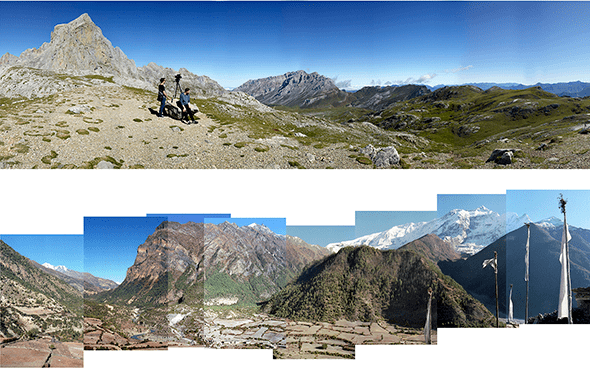
About these images
These are two very different panoramas.
I shot the first image at the top image at Fuente De, Picos de Europa, Northern Spain, using a medium format Phase One camera with an 80mm lens and a dedicated panoramic tripod head.
I shot the second image in the Mustang region of Nepal on 35mm colour print film using a Canon AE1, hand held.
I think that both of these images are stunning. One is digitally perfect, the other is full of analogue errors, though both are equally charming.