In this blog tutorial, we demonstrate how to use shutter speed in two different ways to correctly expose the same scene.
Using your own camera, follow our step-by-step guide outlined below, and in the video, to create your images.

1. Creating a correctly exposed image with motion blur
In the first example, we create a correctly exposed image that includes motion blur. To do this on your own camera:
- Begin with your settings at mid-range values
- Check the light metre
- Decrease shutter speed to create motion blur
Decreasing shutter speed may require the use of a tripod to avoid camera shake.
Now take a practice image. You will see that motion is blurred but the image is over exposed. In order to decrease the exposure while blurring motion you need to either:
- Increase the f-stop, or
- Decrease the ISO
In our example, we are unable to reduce the ISO as it is already at its lowest setting. So we increase the f-stop. Increasing the f-stop allows us to correctly expose the image.
Try doing this on your own camera. Your image should now be correctly exposed and contain motion blur.
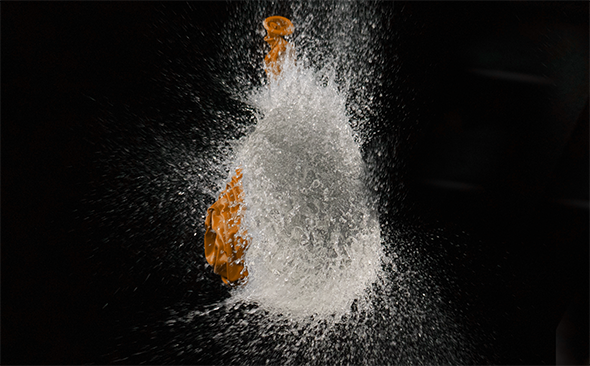
2. Creating a correctly exposed image and freeze motion
In our second example, we create a correctly exposed image and freeze motion. To do this on your own camera:
- Begin with your settings at mid-range values
- Check the light metre
- Increase shutter speed to freeze motion
Now take a practice image. You will see that motion is frozen but the image is under exposed. In order to increase the exposure while freezing motion you need to either:
- Decrease the f-stop, or
- Increase the ISO
Decreasing the f-stop reduces the depth of field, however this is acceptable as the intended style is to freeze motion.
In our example, we have set the camera to its lowest possible f-stop and fastest shutter speed but the image is still under exposed. To correct the exposure, the ISO must be increased. While this might introduce noise into the image, it allows us to achieve a balanced exposure while freezing motion.
Try doing this on your own camera. Your image should now be correctly exposed and contain freeze motion.
Comparing both images
If you compare your two images, you can see that with different settings the exposure is still the same but the style is different.
This example demonstrates that if you adjust exposure with shutter speed you will have to change either aperture or ISO to create a balanced exposure.
In our tutorial, the exposure triangle helps you to visualise the relationship between aperture, shutter speed and ISO when creating a correctly exposed image. It is important to consider the effect that each of these settings will have before taking a photo. This will allow you to create a correctly exposed image with the style you intend.
Watch this video to learn how to use shutter speed
To learn how you can further develop your photography skills, check out our range of courses.
Comments
Hi
I will like to know more about photography